Homemade Polytunnels

lupinfarm

Almost Self-Reliant
Joined
Jul 23, 2008
Messages
1,276
Reaction score
1
Points
124
Location
Springbrook, Ontario
homesteadmomma said:
OOOOH, this is the link for me, my dh just suggested we cover our raised beds so we could start earlier and harvester later, this is right up my alley.
We've decided to create a lean-to greenhouse in a gambrel style off the side of our garage which gets full sun :) We'll put chains off the timbers, and hang shelves for seed flats. It'll be awesome, I'll be sure to get lots of photos for those interested.
 

lorihadams

Always doing laundry
Joined
Oct 31, 2008
Messages
5,415
Reaction score
2
Points
208
Location
virginia
We have done this, and rather cheaply I might add. We had a large, long piece of pipe that we made sure small pvc pipe would fit into the metal pipe. Next we cut sections of the metal pipe into 8 inch pieces and drove them into the ground about 4 inches on each side of our raised beds. We then put the pvc pipe into the metal pipe on each side creating a tunnel over our raised beds. We did it so that our seedlings wouldn't get flooded from all the forecasted thunderstorms and everything is working beautifully. We bought plastic tarps (the clear ones) and zip tied them to the pvc. My husband ran a length of straight pvc pipe along on of the long sides so that I could raise it up to water everything.

I hope this is clear, I will go outside today and try to post some pics of the tunnels. Hope this helps! It was probably $20-$30 to do and we have 2 raised beds 4'x12' long.
 

lorihadams

Always doing laundry
Joined
Oct 31, 2008
Messages
5,415
Reaction score
2
Points
208
Location
virginia
Okay here are the pics as promised

Here are the metal supports with the pvc inside
P5180209.jpg

Here are the finished tunnels, the long piece of pvc is on the bottom with the tarp zip tied to it so that you can raise it for sun exposure and easy watering
P5180210.jpg

Here are the finished tunnels on both beds one with the tarps down and one with the tarps up
P5180208.jpg


Hope this helps!
 

big brown horse

Hoof In Mouth
Joined
Apr 23, 2009
Messages
8,307
Reaction score
0
Points
213
Location
Puget Sound, WA
Very very cool!! Did you just drive those holders into the ground, like with a hammer? How long were they and how long is the PVC. Forgive me if you already described this earlier.
 

lupinfarm

Almost Self-Reliant
Joined
Jul 23, 2008
Messages
1,276
Reaction score
1
Points
124
Location
Springbrook, Ontario
lorihadams said:
Okay here are the pics as promised

Here are the metal supports with the pvc inside
http://i686.photobucket.com/albums/vv225/lorihadams/farm pics/P5180209.jpg
Here are the finished tunnels, the long piece of pvc is on the bottom with the tarp zip tied to it so that you can raise it for sun exposure and easy watering
http://i686.photobucket.com/albums/vv225/lorihadams/farm pics/P5180210.jpg
Here are the finished tunnels on both beds one with the tarps down and one with the tarps up
http://i686.photobucket.com/albums/vv225/lorihadams/farm pics/P5180208.jpg

Hope this helps!
Thank you! that is EXACTLY the type of design I was looking for! That'd be great for starting lettuces, peppers, tomatoes with! ...
 

lorihadams

Always doing laundry
Joined
Oct 31, 2008
Messages
5,415
Reaction score
2
Points
208
Location
virginia
Big brown horse

We cut the pipe into 8 inch pieces and drove them into the ground with a hammer about 4 inches. It isn't going anywhere. We spaced them about 2 feet apart on both sides.

The pvc pipe is probably somewhere around 10 ft. DH got them at Home Depot and said they were pretty cheap. If you wanted to make the tunnels lower and closer to the plants then you would just have to keep trimming the pvc until it gets to a length that works for you. We just cut the pipe with a hacksaw. It took us about an hour to do both beds and of course, the second one went much faster once we worked out the kinks on the first one. We just used zip ties to attach the tarps to the pvc. We put a couple of nails on the bottom of the bed to allow the long piece of pvc with the tarp to rest on when the tunnel is closed. We did have to put a staple in the corners of the tarp to keep it from blowing off the other side, even with the zip ties.

The good thing about this is that at the end of the season you can just pull out the pvc and lay it flat to store it. Because it is flexible it will bend right back when you need to use it next year. We will probably have to replace the tarps but we just used plastic drop cloth tarps to fix this up quickly. It was really inexpensive and pretty easy to do.
 

big brown horse

Hoof In Mouth
Joined
Apr 23, 2009
Messages
8,307
Reaction score
0
Points
213
Location
Puget Sound, WA
Thank you for the description!! I've got it now!! I have been toying with making one of these all spring long. I thought in the beginning, hulahoops :p 
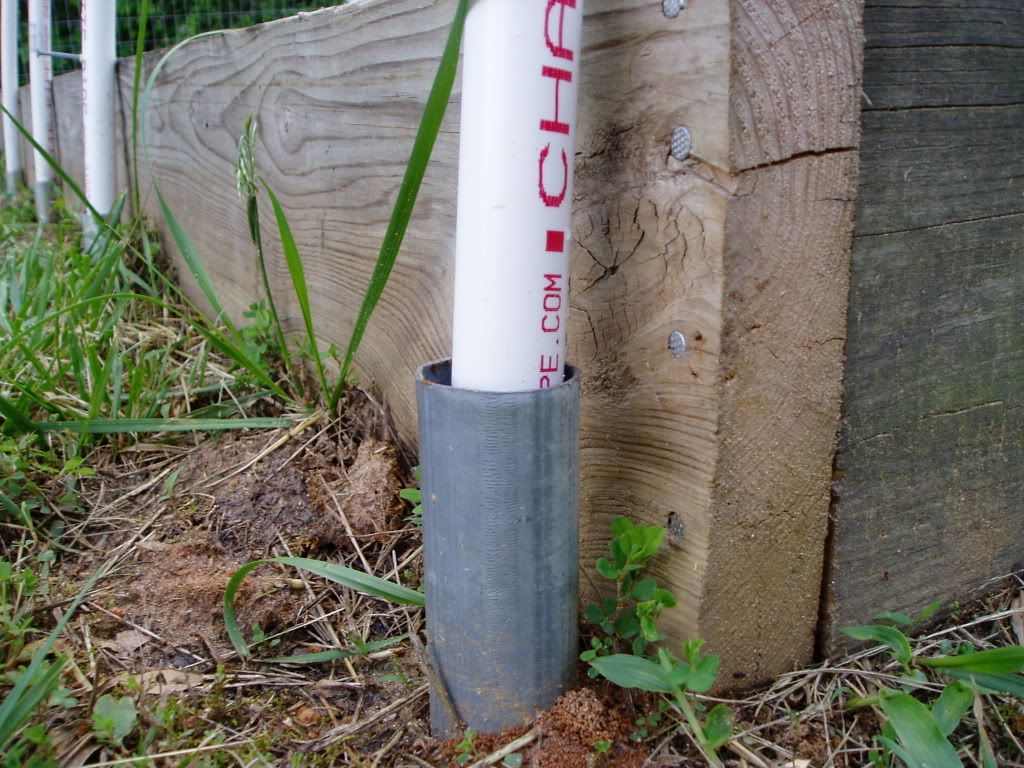
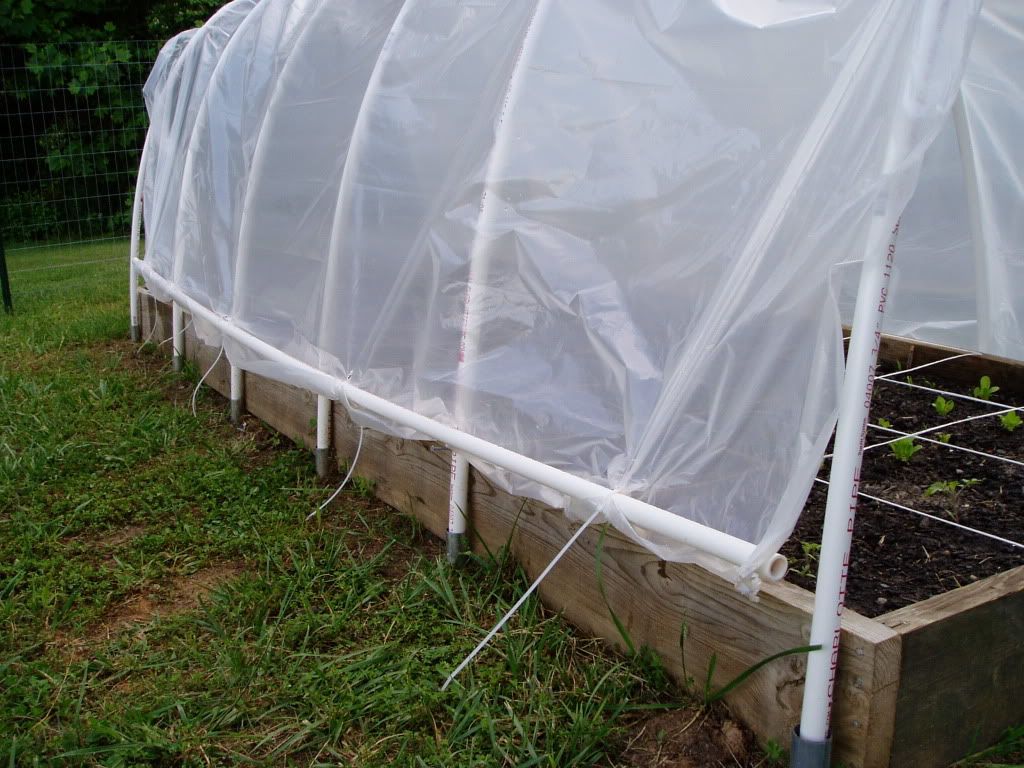
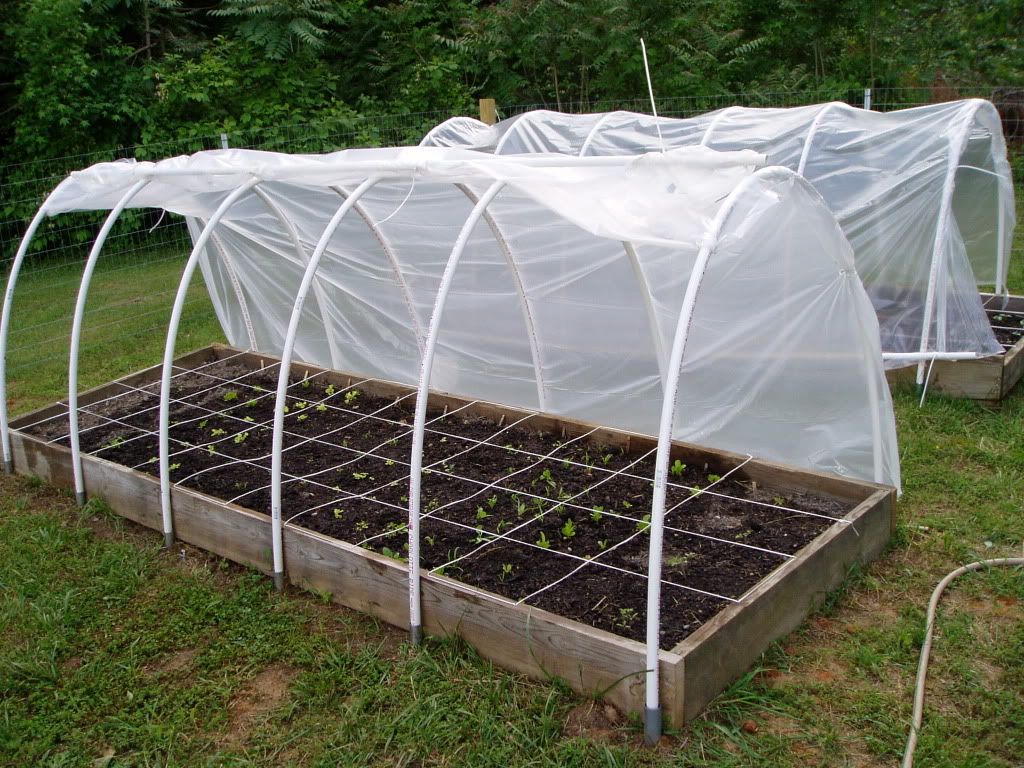
would be the right size for me if they were cut in half. I thought they would be cheap too. I like your idea better, it is bigger and better! How does it hold up in the wind? We have lots of wonderful wind here. (Next year a windmill!!)
 
Top