Horse Jumps

lupinfarm

Almost Self-Reliant
Joined
Jul 23, 2008
Messages
1,276
Reaction score
1
Points
124
Location
Springbrook, Ontario
They're homemade technically :) I just wanted to show-off a bit. I made these 5ft basic schooling standards last night, and I've got more to make because I have orders coming in... apparently people want to buy my jumps LOL

jumpstandardsbasicschooling.jpg


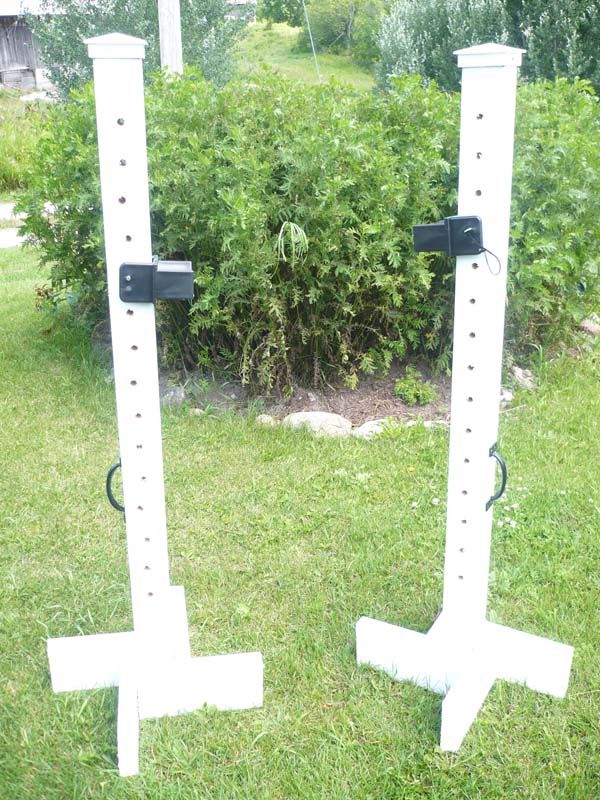
They have handles on them for easy moving around, I remember being a little kid and having a heck of a time trying to move standards from accross the arena so I put handles on them to make them easy to move! They're pretty much balanced so you don't have a heavy end also. I make deluxe schooling standards too which have a bigger footprint and are more suitable for use in a grass riding ring, jump poles, and I'm going to try my hand at wing standards as well :)
 

lupinfarm

Almost Self-Reliant
Joined
Jul 23, 2008
Messages
1,276
Reaction score
1
Points
124
Location
Springbrook, Ontario
Haha... I'm pretty proud of them. I make 4ft and 5ft, I've never had success with 6fts because they're just too top heavy and without a massive base they kind of...topple... I suppose I could make them as the wing jumps because they'd have extra support but MEH.

The handles are so great, cause lets face it... jumps are kind of cumbersome and awkward things.
 

modern_pioneer

Mountain Man
Joined
Feb 27, 2009
Messages
1,394
Reaction score
15
Points
192
Location
In the woods with the critters
Those look nice, great idea.....

I was wondering if you wanted some advice in how to improve your making of them?

I ask this because I believe I can assist you with the making of your product. Some people do get offended when others offer advice, so I wanted to ask before I posted.

Once I see your response, if you allow me to help you, can you stay on line for a few minutes tending this thread so I can get some answers from you?
 

freemotion

Food Guru
Joined
Jan 1, 2009
Messages
10,817
Reaction score
90
Points
317
Location
Southwick, MA
Nice standards! Love the handle, it means you don't have to hold a dusty standard against your clothes....

MP, in your design ideas, keep in mind that horse people are super concerned with the safety issue....jumps are made to fall apart easily when hit by a horse....or an ejected rider. So what you might be thinking in terms of sturdiness or stability might have safety implications. I'm curious to see what you're thinking, though!
 

lupinfarm

Almost Self-Reliant
Joined
Jul 23, 2008
Messages
1,276
Reaction score
1
Points
124
Location
Springbrook, Ontario
Go ahead MP! ... I'd love to hear your advice. These plans were originally taken from a book we own and have been modified slightly. I'm still not sure I entirely LIKE the 2x6 feet... I'd prefer 2x8 and instead of 1ft length, perhaps 16 inches with a mitered end for looks. I had to do my cup holes with the drill because the drillpress is out of comission until the garage floor gets cemented, so they're not really as perfect as i wish they could be.
 

modern_pioneer

Mountain Man
Joined
Feb 27, 2009
Messages
1,394
Reaction score
15
Points
192
Location
In the woods with the critters
You can make a drill jig that that will put your holes in line as well as center, being that your drilling them by hand having a better layout system will make this a whole lot faster.

Materials you will need.

A square
marker
cardboard
tape
rubber band
razor knife
drill
1/8 drill bit

Using the square, layout the cardboard to the width which I think is 3.5 inches as well as the length. If you need to make it several pieces of cardboard to get the correct length you can tape them together. Using the razor knife, take your time and cut the card board nice and straight.

Now set your square to 1 3/4 of an inch, draw a center line the whole way down the carboard. Once that is complete, I am assuming your holes are 4 inches from centers, take the scale off your square or use a measuring tape, on the center line, lay your hole centers out down the complete length of your cardboard.

Using your drill and 1/8 drill bit, drill the centers out of the cardboard, once that is complete, you now have a layout jig that you can place on top, use a marker throught the holes in the jig that you made, remove your jig, roll it up, put it away, and now you have all your centers on your piece of wood.

If you plan to make more than 5 sets of these, than making a jig/layout pattern will save you a lot of layout time, as well, you will have a even better looking project at the end.

As a fabricator myself, i am always looking to make production easier and faster as long as quality doesn't suffer.

I hope that my advise helps you save time, that was my goal in helping you to improve your approach to making these, which BTW is a wonderful idea.

:thumbsup :thumbsup
 

lupinfarm

Almost Self-Reliant
Joined
Jul 23, 2008
Messages
1,276
Reaction score
1
Points
124
Location
Springbrook, Ontario
Thanks MP! .. That was great advice and I will try it with the next set. As you can see, only one of the standards has wonky holes, this was one that I took the jump cup and marked off on both sides for the holes... oddly the other one isn't this way at all and ended up perfectly straight and fine with no "wonky" holes. I'm definitely going to try your advice.
 

patandchickens

Crazy Cat Lady
Joined
Jul 12, 2008
Messages
3,323
Reaction score
6
Points
163
Location
Ontario, Canada
Yup, definitely a jig for drilling, especially if you are going to sell any -- you just cannot drill sufficiently perpendicular by hand thru a 4x4 (every single time, which is what it takes) to reliably fit jump cups. A jig or an attachment for your drill will make it ever so much faster and give excellent consistent results.

Longer feet would help -- like 1.5-2' instead of just 1'. Give you much better stability, especially on a breezy day on uneven ground.

And I've found it greatly helps the longevity of standards to take some caulk and either fill the whole joint with caulk when you screw each part of the 'foot' on (which gives the best result, but obviously has to be done at the time, not retrofit) or for the one you've already made you can at least run a bead of caulk around/into all sides of the gap where the board meets the 4x4 and other boards. I know it seems like this could trap moisture inside the joint and cause accellerated rot but IME it doesn't, actually makes the standard last longer. Since this style doesn't last especially long, it's worth doing what you can to make it last longer.

I totally love the handle idea, that is wonderful!

Nice job, have fun,

Pat
 

lupinfarm

Almost Self-Reliant
Joined
Jul 23, 2008
Messages
1,276
Reaction score
1
Points
124
Location
Springbrook, Ontario
Thanks Pat, Yeah I'm not entirely satisfied with the length of the feet... again I took the original plans from Jumps, Etc. and when I was looking at it I though "huh, that's really short," this set is for my own use and all the others will have long feet on them. The jump cups fit perfectly on all holes (I tested them all :) ) and it's more of a cosmetic thing the wonky holes but I am totally going to try the jig.
 
Top