reupholstering

elijahboy

Lovin' The Homestead
Joined
Jul 26, 2009
Messages
724
Reaction score
1
Points
93
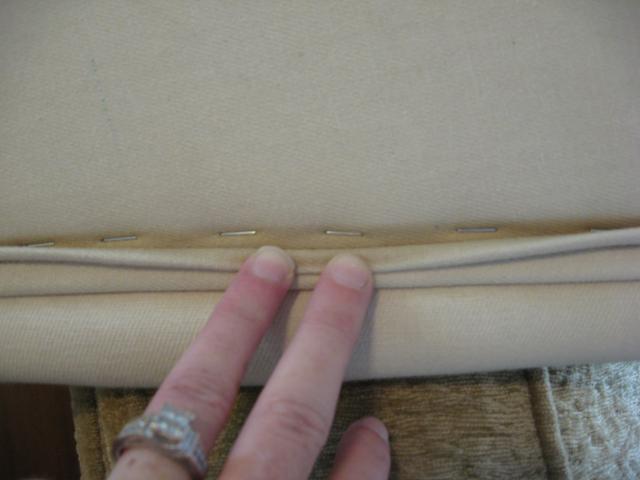
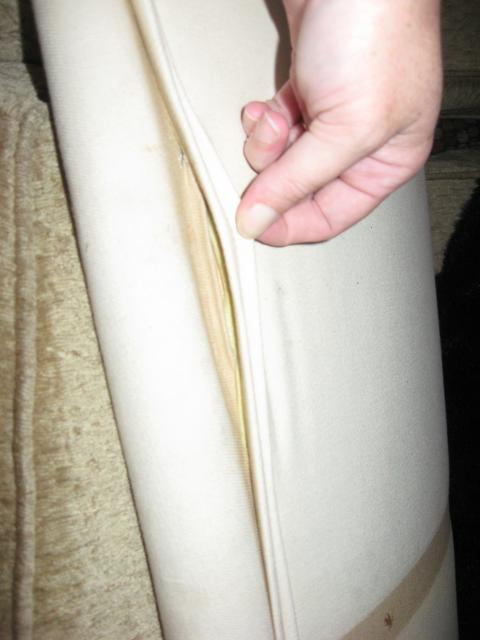
the problem is its not welting its just like extra fabric

i'll try to explain it in a different use

think about roman shades that are pulled taught to the top of the window

now picture the folds in the shade thats what that odd seam is like

no one probably will understand what the heck im trying to explain cause i dont even know how to explain it

i know what your are referring to though with the rope thing...you find it on alot of furniture from the late 90s


SSDreamin said:
The seats should be a snap - I've done several like those and it's very easy (duh! If I could do it, it MUST be easy! :lol: ) The welting on the back of the uprights would be the trickiest part of those (I may be corrected by someone much more knowledgeable, but welting is just rope wrapped in fabric and stitched). I was told by someone who does this for a living, to carefully take one of the chairs upholstery apart, then use that as a pattern. The trick is, to remember where every piece went and how to put it back together. :idunno
 

SSDreamin

Almost Self-Reliant
Joined
Jul 14, 2011
Messages
1,702
Reaction score
7
Points
108
Location
Michigan
If that part of the project makes you nervous, do you have to have it? I mean, could you redo them without it and have it look OK? Just wondering...
 

hqueen13

<Insert Snazzy Title Here
Joined
Nov 23, 2011
Messages
3,664
Reaction score
381
Points
277
Location
Fallston, MD
elijahboy said:
i think the first thing im going to do (since in the pic the stains look like grease stains) is buy some greased lightning and clean them again with the rug doctor

like you said reupholstering the bottom will be super easy

i was thinking with the back part (take all the chairs apart entirely) is make like a skin (for cell phones) and just slip it over but i will lose that odd seam on the back
Well you could keep the odd seam look if you made piping yourself, which isn't THAT hard to do, it just takes time. And it should be cut on the 45 bias of the fabric you're using (that's the extent of my knowledge right there! LOL)

I'm not sure if that helps or not! I wonder if there are patterns for slip covers out there that would work. It sounds like you really appreciate the embelishment that the piping adds.

I also have to wonder how the chair itself was constructed. Maybe it is hand stitched on. That would be a pain, of course, but possible I suppose.
 

elijahboy

Lovin' The Homestead
Joined
Jul 26, 2009
Messages
724
Reaction score
1
Points
93
haha you laugh at yourself but laugh at me cause i dont even know what a 45 bias is


hqueen13 said:
elijahboy said:
i think the first thing im going to do (since in the pic the stains look like grease stains) is buy some greased lightning and clean them again with the rug doctor

like you said reupholstering the bottom will be super easy

i was thinking with the back part (take all the chairs apart entirely) is make like a skin (for cell phones) and just slip it over but i will lose that odd seam on the back
Well you could keep the odd seam look if you made piping yourself, which isn't THAT hard to do, it just takes time. And it should be cut on the 45 bias of the fabric you're using (that's the extent of my knowledge right there! LOL)

I'm not sure if that helps or not! I wonder if there are patterns for slip covers out there that would work. It sounds like you really appreciate the embelishment that the piping adds.

I also have to wonder how the chair itself was constructed. Maybe it is hand stitched on. That would be a pain, of course, but possible I suppose.
 

elijahboy

Lovin' The Homestead
Joined
Jul 26, 2009
Messages
724
Reaction score
1
Points
93
not sure to tell if it is hand stitched wonder is the staples are any indication :lol:

this is what i found under the seam that i so love

1131_002_3.jpg


hqueen13 said:
elijahboy said:
i think the first thing im going to do (since in the pic the stains look like grease stains) is buy some greased lightning and clean them again with the rug doctor

like you said reupholstering the bottom will be super easy

i was thinking with the back part (take all the chairs apart entirely) is make like a skin (for cell phones) and just slip it over but i will lose that odd seam on the back
Well you could keep the odd seam look if you made piping yourself, which isn't THAT hard to do, it just takes time. And it should be cut on the 45 bias of the fabric you're using (that's the extent of my knowledge right there! LOL)

I'm not sure if that helps or not! I wonder if there are patterns for slip covers out there that would work. It sounds like you really appreciate the embelishment that the piping adds.

I also have to wonder how the chair itself was constructed. Maybe it is hand stitched on. That would be a pain, of course, but possible I suppose.
 

SSDreamin

Almost Self-Reliant
Joined
Jul 14, 2011
Messages
1,702
Reaction score
7
Points
108
Location
Michigan
Ooooo - that could mean the decorative 'seam' is just top dressing to cover the staples. You could reproduce that fairly easy, then hot glue/tack it in place?

45 degree bias is cutting the fabric at 45 degrees, instead of the usual 90, right? I think? :p
 

hqueen13

<Insert Snazzy Title Here
Joined
Nov 23, 2011
Messages
3,664
Reaction score
381
Points
277
Location
Fallston, MD
45 degrees on the bias means that you would cut the fabric across a 45 degree angle to the direction the threads are stitched in. So you have vertical threads and horizontal threads in the weave of fabric (assuming that it is not a knit). So you are cutting diagonally across both sets of threads. It can be tricky to find the exact angle as sometimes the fabric stretches a bit one way or the other.

It could still be constructed by hand even with the staples, but obviously your beloved seam is hiding the staples, so that is the whole purpose of the seam itself. I still am unsure how the piece is put together completely... I don't know if a "front" and "back" were put together, maybe glued on? Its a shame that sacrificing a chair to figure out how it is constructed could ruin it!

That seam wouldn't be that difficult to recreate, you'd need to make a little pocket in fabric, and then that pocket is flattened and stitched down the middle. The is probably something semi-soft inside the pocket, like batting or something, that makes it slightly puffy.

Sounds like a fun challenge to me!! (I'm still in favor of slip covers :p You could make them as fancy as you wanted, and even add a decorative seam similar to the one on the chair, and they'd be washable! (Can you tell I like things that are cleanable??))
 

elijahboy

Lovin' The Homestead
Joined
Jul 26, 2009
Messages
724
Reaction score
1
Points
93
1131_007.jpg


i took some of the staples out

hope it helps

never knew math was involved in upholstery
 

hqueen13

<Insert Snazzy Title Here
Joined
Nov 23, 2011
Messages
3,664
Reaction score
381
Points
277
Location
Fallston, MD
So from the little bit you've posted it appears that the back part of the chair is a separate piece that is attached over where the edges of the fabric wrap around from the front. How is the back piece attached? I know you said you took out staples, but were they holding down the front piece or the back piece?

Do you have a really good fabric store in your area? Something not like a Joann's or Hancock fabric, but a real independent fabric store? If you can swing a trip by there when they might not be busy, then you can often get really good assistance.
 
Top