Joel_BC
Super Self-Sufficient
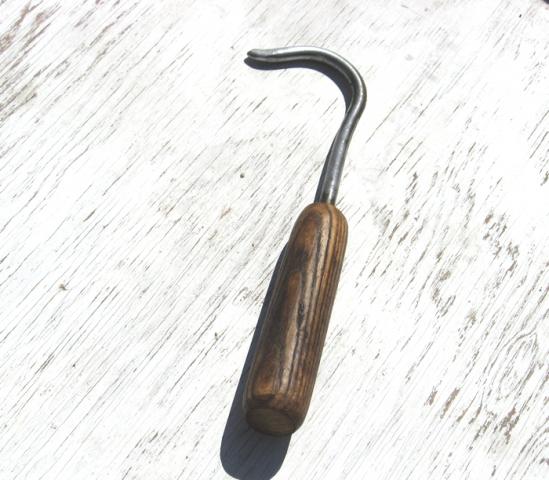
I designed this as an alternative to the common three-fingered small garden claw. There may be tools like it on the market, but not in my region. For weeding, we use a rototiller and hoe for the broad-scale work. But a lot of the work of weeding gets down into small spaces right around the desired plants in a vegetable or decorative bed. The tool I made digs right in there.
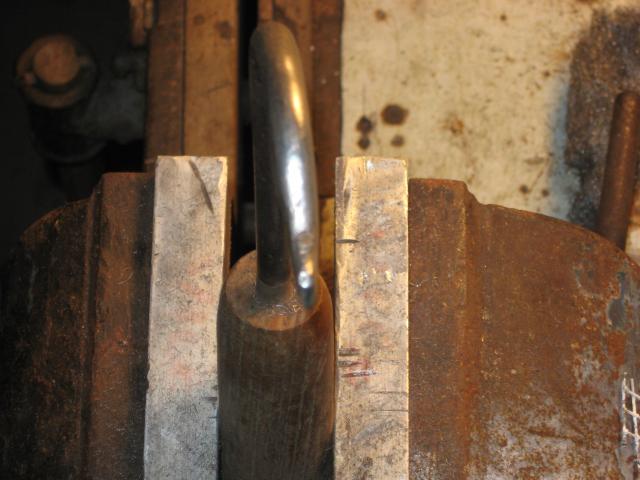
The business end of the tool is made from 1/4″ mild-steel rod. I cut a piece about 8″ long, heated about half of it into the glowing-orange heat range, and used a piece of 2″ diameter steel pipe as a form for shaping it. Having clamped the section of pipe into my bench vise, I used a hammer to coax one end of the hot steel rod into a sort of question-mark shape (reheating the rod as necessary while I worked on it).
I used an oxy-acetylene torch for the heating, though you could use a blacksmithing forge for the purpose.
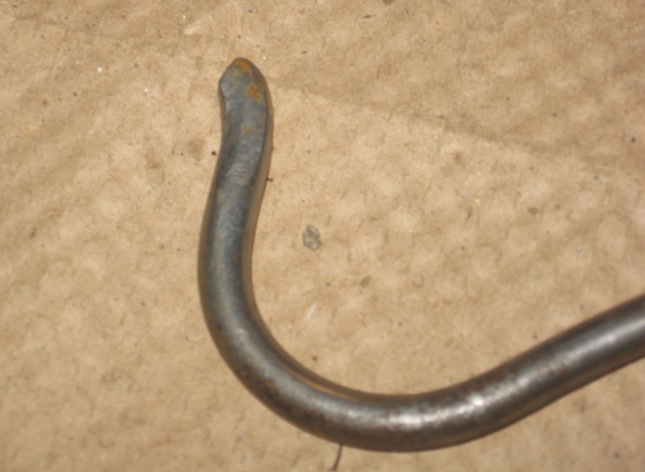
After making the basic shape, I heated the very end of the rod and hammered it to a taper, which causes a slight flaring at the tip end of the profile. So, once the taper was basically established, I did a bit of grinding (using a bench grinder, and a belt grinder) to remove any burrs and to give final shape to the tip.
Two views of he tip:
When I was satisfied with the metal portion, my focus shifted to making a handle. I chose a piece of ash wood a 5″ section of an old broken shovel handle. I shaped this into a comfortable handle using a coarse belt on my belt grinder. Once I was happy with the feel of the shaped handle, I drilled a 5/16″ hole about 2″ into the appropriate end, and cleaned it out well. I coated about an inch and a half of the shank-end of the shaped steel rod with a fairly thin layer of epoxy glue, and pushed it fully into the handle. Excess oozed out of the handle, so I cleaned that off. Then I let the glue set and cure for about 48 hours.
Once the bond was strong, I just cleaned up the finished tool. I rubbed some vegetable oil into the handle so that it would have a bit of resistance to the moisture thats everpresent with both sweaty working hands and garden soils.
I wasnt sure just how much use this tool would get. But I now find myself using it about three times as much as I use a standard garden claw or a trowel.
A person who was helping us for a few days with weeding our gardens and who had her choice among maybe a dozen tools said this one-finger gadget wound up being her tool of choice. So I felt like my design and tool-making effort succeeded. Not that I see myself as "a fine tool maker"... I'm not, but I admire those who are. But this was satisfying.
The business end of the tool is made from 1/4″ mild-steel rod. I cut a piece about 8″ long, heated about half of it into the glowing-orange heat range, and used a piece of 2″ diameter steel pipe as a form for shaping it. Having clamped the section of pipe into my bench vise, I used a hammer to coax one end of the hot steel rod into a sort of question-mark shape (reheating the rod as necessary while I worked on it).
I used an oxy-acetylene torch for the heating, though you could use a blacksmithing forge for the purpose.
After making the basic shape, I heated the very end of the rod and hammered it to a taper, which causes a slight flaring at the tip end of the profile. So, once the taper was basically established, I did a bit of grinding (using a bench grinder, and a belt grinder) to remove any burrs and to give final shape to the tip.
Two views of he tip:
When I was satisfied with the metal portion, my focus shifted to making a handle. I chose a piece of ash wood a 5″ section of an old broken shovel handle. I shaped this into a comfortable handle using a coarse belt on my belt grinder. Once I was happy with the feel of the shaped handle, I drilled a 5/16″ hole about 2″ into the appropriate end, and cleaned it out well. I coated about an inch and a half of the shank-end of the shaped steel rod with a fairly thin layer of epoxy glue, and pushed it fully into the handle. Excess oozed out of the handle, so I cleaned that off. Then I let the glue set and cure for about 48 hours.
Once the bond was strong, I just cleaned up the finished tool. I rubbed some vegetable oil into the handle so that it would have a bit of resistance to the moisture thats everpresent with both sweaty working hands and garden soils.
I wasnt sure just how much use this tool would get. But I now find myself using it about three times as much as I use a standard garden claw or a trowel.
A person who was helping us for a few days with weeding our gardens and who had her choice among maybe a dozen tools said this one-finger gadget wound up being her tool of choice. So I felt like my design and tool-making effort succeeded. Not that I see myself as "a fine tool maker"... I'm not, but I admire those who are. But this was satisfying.
")
 A bit small, maybe?
