Upcycled/repurposed projects (MANY)

Joel_BC

Super Self-Sufficient
Joined
Nov 21, 2011
Messages
1,284
Reaction score
318
Points
227
Location
Western Canada
Here's a wire winder that a guy made. Could be helpful for winding up old vinyard wire (as the article mentions), or numerous other kinds of wire. For outoor use, as it is powered by a gasoline engine.
4407_wire_winder.jpg


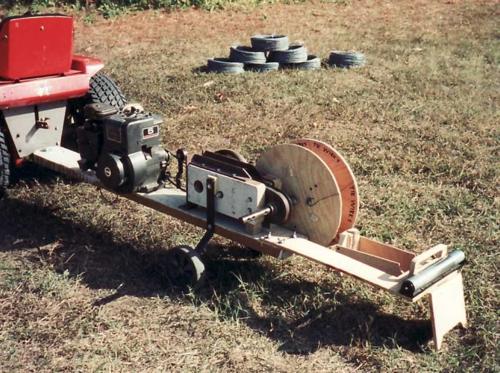
Uses a lawnmower type engine, transmission (for gear-down), pulleys and v-belt, and various other repurposed or scrap parts. It's given a basic explaination in an Instructables article.
http://www.instructables.com/id/Winder-of-wires/?ALLSTEPS
 

Joel_BC

Super Self-Sufficient
Joined
Nov 21, 2011
Messages
1,284
Reaction score
318
Points
227
Location
Western Canada
I have admit this is a very clever adaptation - the coordinated use of a couple of common shop power tools (a drill press, and a circular sanding wheel) because there was no machinist's lathe or milling machine in this guy's shop. Necessarily, both machines are turning at once.

"Redneck Milling Machine"
http://www.youtube.com/watch?v=qa398lTv-ug

The alignment of the two tools in relation to the workpiece would be pretty tricky!

The end result could be reasonably good, though obviously not as precise as if he'd had access to the conventional (but expensive) equipment.

Talk about repurposing and "making do"...!!
 

Joel_BC

Super Self-Sufficient
Joined
Nov 21, 2011
Messages
1,284
Reaction score
318
Points
227
Location
Western Canada
I realize there are a lot of variants on the home egg incubator. This one strikes me as very interesting. Of course, it uses a lot of re-purposed components. The parts list is pretty complete, I think. The description helps you to understand what the pictures do and don't show - and I'm glad there are three pictures. It took a while for me to see the position of one of the light bulbs used as a heating element.

A bit of thought helps to figure out some of the aspects that aren't diagrammed or shown in pics.

Here's the designer's descriptive post:
http://albertachickensetc.punbb-hosting.com/viewtopic.php?id=20481

I'm curious to find out if the designer/maker has published diagrams for it, somewhere else.
 

Joel_BC

Super Self-Sufficient
Joined
Nov 21, 2011
Messages
1,284
Reaction score
318
Points
227
Location
Western Canada
This guy designed log-gripping jaws that could be attached to his Black & Decker Workmate portable carpenter's bench. The object was to have something portable and lightweight that can hold a log (up to 8-inches diameter) at a height for easy chainsaw cutting. Valuable idea.
4407_workmate_log_jaws.jpg

He cut the jaws from 3mm sheet steel, using a plasma CNC cutter. A similar sort of sheet-metal cut-out could be done, albeit more slowly, with other tools, however (few people have easy access to a snazzy plasma cutter such as he used). He used a fabrication-shop press style sheet-metal folder to fold the pieces into three-dimensional shape; again. I think the home-shop handyman could come up with a makeshift method to accomplish the same thing.

The idea is the most important thing, and the guy explains the practicalities of his design and presents step-by-step instructions for how he went about it.

http://www.instructables.com/id/Log-Clamping-Jaws-for-Black-Decker-Workmate-Cu/
 

Britesea

Sustainability Master
Joined
Jul 22, 2011
Messages
5,676
Reaction score
5,733
Points
373
Location
Klamath County, OR
Couldn't you just make two "X" shapes of wood, and plop the log into the V shaped top? It's called a sawbuck
 

Joel_BC

Super Self-Sufficient
Joined
Nov 21, 2011
Messages
1,284
Reaction score
318
Points
227
Location
Western Canada
Britesea said:
Couldn't you just make two "X" shapes of wood, and plop the log into the V shaped top? It's called a sawbuck
Yeah. Advantage of the sawbuck would be simplicity of construction, and that the materials would be ready at hand, and that it may be better suited to a situation where you're cutting from longer log lengths. Disadvantages of the sawbuck would be that it's probably heavier (i.e., slightly less portable), usually not adjustable for different heights, would have less grip on the log (since the above guy's design has teeth in the metal V-notched log rests), and usually not specifically adjustable for differing length logs. This guy's design is adjustable for different log lengths, but I'd say it cannot accommodate real long logs.

Besides the question of what length of log you're likely to be cutting, choice obviously depends on just what you want the set-up to do and how much effort you feel like putting into its construction.
 

Joel_BC

Super Self-Sufficient
Joined
Nov 21, 2011
Messages
1,284
Reaction score
318
Points
227
Location
Western Canada
I'm posting this to let people know about the Farm Hack site. Essentially, this is a system of networking and events produced by ag students, design students, some of their instructors, interested farmers, and others. It's all about experimentation and design development - more or less along the lines of what this thread has been about.

"Community-based design" is a term they use. Repurposing of components, parts, materials and such can all fit into the fabrication aspect.

The video at the top left of the page gives a better explanation of what this project and these people are about than I can give in writing. (I think the message really comes across starting at about the 24-second point and onward.)

http://farmhack.net/home/

They're working to inspire innovation and appropriate technology.
 

Joel_BC

Super Self-Sufficient
Joined
Nov 21, 2011
Messages
1,284
Reaction score
318
Points
227
Location
Western Canada
Grant Thompson is plainly a capable guy. Grant presents a few videos that show how he made a spot welder from repurposed old microwave-oven parts, some common softwood stock, ordinary hardware-store bits, etc. He claims he made his spot welder for within $10!
4407_make_spotwelder.jpg


First, he explains how he removed useful components from a discarded microwave oven. For the spot welder, he needed portions of the transformer. He gets to the transformer part of the disassembly process halfway through this vid:
http://www.youtube.com/watch?annota...&feature=iv&src_vid=GCrqLlz8Ee0&v=TVkioe3PJz0

Next, he explains the making of the "metal melter", which is his electrical heart of his contraption:
http://www.youtube.com/watch?v=d5pGN6pqkyY

This video shows, step-by-step, the construction of the spot welder. He demos how it works, too.
https://www.youtube.com/watch?v=vrlvqib94xQ
 
Top